Schedules
Managing Scheduled Workflows
Choose Repository > Policy Actions and open the Schedules list. The following window is displayed:

The schedules list provides the following information:
| Column | Description |
|---|---|
| Name | Name of the schedule |
| Description | Description of the schedule |
| Workflow | The workflow to run |
| Running Pattern (By Time Zone) | Running or recurrence pattern of the scheduled workflow |
| Next Run (By Local Time) | Time of the next run due |
| Last Saved | Last save (modification) time |
| Saved By | User responsible for the last save (modification) |
Opening the Workflow
Click any Schedule and expand the right hand menu. Next to the workflow name, click the Icon to open the Workflow Designer in a new window.
Operations on Schedules
For a selected schedule, the following action icons are available:
| Icon | Description |
|---|---|
| Disable the schedule | |
| Enable the schedule | |
| Delete the schedule | |
| Add a new schedule |
Unavailable icons are grayed out.
The Actions (three-dot) menu on a trigger allows you to do the same actions.
Adding Schedules
To add a schedule:
- From the top right corner of the schedules list, click the plus icon.
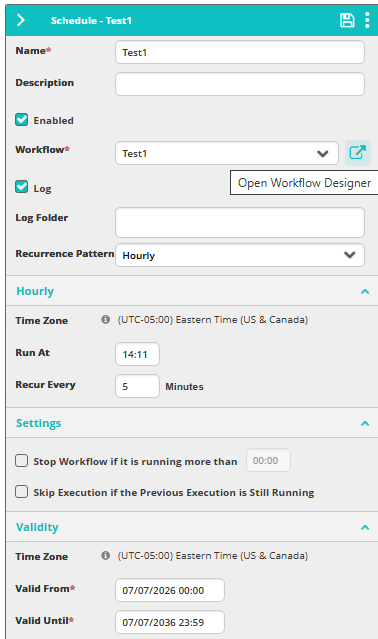
The schedules properties screen appears. - In the Name field, enter the name of the schedule.
For example: "Daily Backup". - In the Description field, enter a description for the scheduled workflow.
- Clear Enabled to disable the schedule.
- From the Workflow field, select the workflow to be run.
- Clear Log if you do not wish to display each running of the selected workflow in the Audit Trail log, otherwise specify the Log Folder.
- In the Recurrence Pattern field, determine whether the workflow is repeated hourly, daily, weekly, monthly, or is simply performed once.
- According to your selection in the previous step, select the workflow's running time frame and the frequency.
- Check Stop Workflow... to specify the timeout of the scheduled workflow and set it.
- Check Skip Execution... to avoid re-running the workflow if the previous scheduled workflow has not yet ended.
- In Valid From and Valid Until, set the validity date frame of the scheduled workflow. note
See Showing Time Zones When Adding a Schedule for time zone specifics.
- Click Save.
Showing Time Zones When Adding a Schedule
Time zone is displayed when creating a new schedule for both the run time and the validity.
- For multi-tenant deployments, the time zone is taken from the tenant settings that you can change in the Tenant Management portal.
- For single-tenant deployments, you need to edit the SQL database to change the time zone, which is set to Eastern Standard Time by default. Open the
dbo.TBL_Settingstable and set theTimeZoneIdrow to a valid Microsoft Windows time zone string. You can use thesys.time_zone_infoview to see the full list of supported time zones.
The same Time Zone is also shown in the Schedules table in both the Running Pattern and the Next Run columns.